
Ever since I read Steven Caney's Kid's America in elementary school I wanted to build the crystal radio receiver pictured near the center of the book: a proto-nerd centerfold, if you will. As a child I did not have the skills to build this project. I wish I lived closer to my grandfather when I originally wanted to build the radio. He set up radio in the South Pacific for the United States Navy: I bet this project would have pleased him to no end!
My mother recently sent me my family's copy of this wonderful book. One could build an entire K-12 American Studies curriculum around the ideas in this book, published just after America's Bicentennial. From Hobo signs to storytelling, crafting to civic action, this book captures what it meant to be an American when being American meant doing it yourself, making, improving.
As a forty year old I decided I had the skills and means to build the crystal radio I always desired. Here is how I followed one set of directions. A quick search of the Internet will yield directions similar to those I followed.
Here is my parts list.
- toilet paper tube or 3D printed toilet paper tube (.STL file provided below!)
- 35 feet 22 gauge solid insulated hookup wire
- germanium diode
- 2 alligator clips
- crystal earphone
- wide rubber band for wire wrapping and radio tuning
- wire cutters/strippers
- Dremel with grinder tool or coarse sandpaper, time, and patience
- scissors
- optional access to a 3D printer or print service
My prototype used a cardboard toilet paper roll like the directions indicated. My directions said I would get twenty nine feet of wire wound around the tube. Perhaps in 1978 toilet paper tubes were larger? I had a significant length of wire left from the twenty nine feet I cut.

The experience of winding the wire and trying to put holes through the cardboard near its edges convinced me I needed a more durable tube. I used my 3D printer, a MakerBot Thing-O-Matic, to print a replica of a cardboard toilet paper roll in ABS plastic. Unfortunately, the height limitation prevented me from printing the tube in one piece.

I redesigned my Tinkercad model to print in two parts that I could glue together. You can modify and download the model.


The two part model was about a centimeter taller than the failed print.

It was the same height and diameter as the toilet paper roll.

I experimented with printing a ring that would fit in the interior of the two halves of the tubes to strengthen the tube when I glued the pieced together. I tried using a raft.


The ABS distorted too much to be useful.

Raftless rings did not work out so well.

I ended up using Testors model glue to affix the two parts without the insert. I purposefully arranged the models and printed them so the parts being glued together would be at the top of the print, less susceptible to distortion on my printer.

I let the glue cure under pressure.

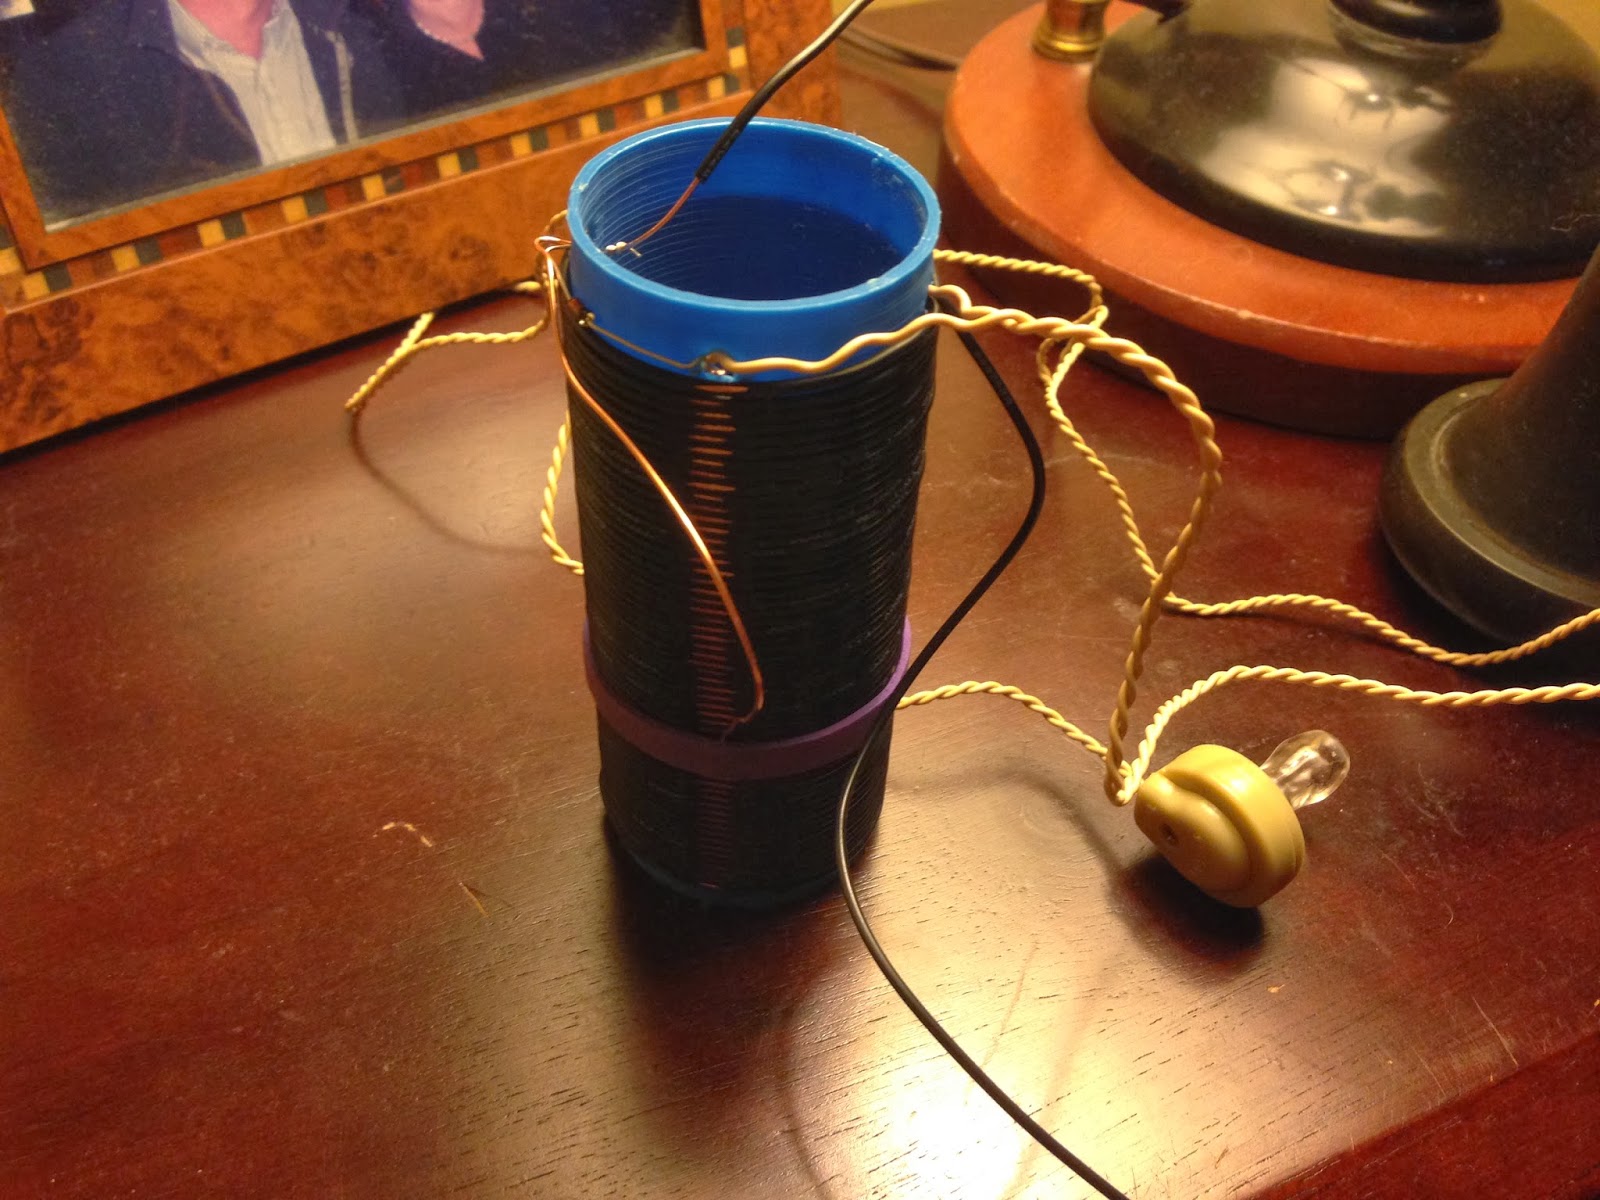
After successfully curing I had a single tube printed in durable ABS plastic. There is a singe hole at one end of the tube. I inserted an inch of wire and started tightly winding the 22 gauge solid insulated hookup wire around the tube. The plastic tube held up much better than cardboard. The rubber band allowed me to put down the project as I worked on it.

When I reached the end of the tube I stripped one inch of insulation from the wire and inserted the wire through hole one of the tube.

Next, I used a Dremel with a grinding attachment to wear off the insulation along the length of the tube. Working slowly proved to be the best strategy. Also, this made a giant mess.

I cut the 1/8" jack from the end of the crystal earphone and stripped the insulation from the wiring. This uncomfortable, clunky earpiece is required and cannot be replaced by a standard earphone.

One of the earphone wires is attached to the end of the tube coil wire through hole one of the tube, where the coil terminates.

A three foot hookup wire with an inch of insulation stripped from both ends is attached to the tube wire and the headphone through hole one. You will have three wires running through hole one: the coil, one of the headphone wires, and one of the hookup wires.

A germanium diode is wired into holes two and three on the tube.

The second wire from the earpiece is wired to the diode through hole two.

Another three foot hookup wire is connected to the diode behind hole three. The last five inches of this hookup wire is stripped of insulation and connected to the diode, then pushed through hole three from behind. This length of wire will touch the coil. By making this hookup touch different places along the coil you tune your crystal radio.


I finished by connecting alligator clips to the ends of the hookup wires.

I clipped one hookup wire to the telephone wiring in my house: the alligator clip attaches to the metal prongs in the wall socket. The other hookup wire clipped to a nearby heating duct to ground the radio. I also grounded it to the cold water shutoff valve in my kitchen with similar results. When you have the radio successfully connected to an antenna and a ground you will hear a click then faint radio static! Eureka, your radio is listening for a signal!
I sat down and slowly swept the coil with the "cat's whisker," listening for a signal. At about this location, pictured below, I could hear a faint radio signal: a man talking! Probably some AM talk radio station, too faint to really hear, but I picked up a signal!

This was a great project that got me thinking in several different directions, from 3D printing to radio technology. I finally built an object that seemed unobtainable as a young maker. I got to iterate on my design at the beginning of the project and the end project benefited from the 3D printed tube. I can proudly display my new old tech next to my wife's grandfather's project that used an old phone as a lamp!
I really hope modern maker parents take the time to geek out and help their kids build a crystal radio. Radio is a technology that connects us to our grandparents, parents, our children and ourselves. This radio is not precise enough to dependably listen to a signal, but it is a fun project that can magically capture sounds from the ether!
Comments