
When I make art, whether it is music or visual or even programming, I really enjoy using a computer to introduce randomness or variability into the work, something a computer makes easy.
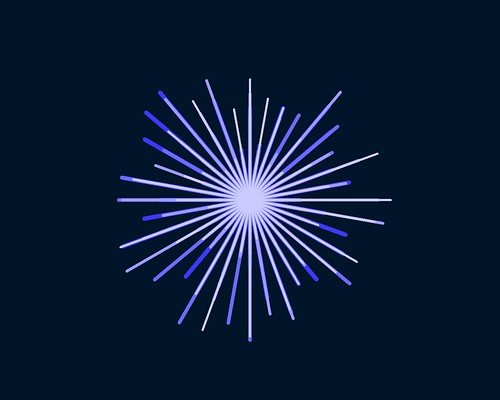
One of the learning adventures in my book is programming Variable Stars in TurtleArt. Instead of a star that looks the same, why not program a star whose rays differ in length and that looks different each time you run the procedure? This design challenge makes for a more aesthetically interesting design because of the variability and a more intriguing programming prompt.
One way I have worked this past year to improve my Logo programming skills is to experiment more with using different colors, shades, and pen sizes. I revisited the Variable Star project with my new skills and remixed it so it ran the procedure three times in different shades and increasingly smaller pen sizes.
I have also been experimenting with 3D printing models that are quite two dimensional in design. I use a 3mm M3 bolt to attach the models to create new models in ways that FDM 3D printers are incapable of printing. The 3D prints are more like the work you would typically use a laser cutter to produce, but I can take advantage of different color filaments as well as create and 3D print models of different thicknesses. The models are combined to create 3D models without large flat bases, that have massive overhangs, and contain secondary shapes resulting in the layering, negative space, or overlapping of model shapes.
I decided to turn the variable stars TurtleArt procedure into attractive holiday decorations for my home. I wanted to move the design from digital to 3D printed. I am going to display the ornaments in two tall vertical windows at my front door. It is like Santa's workshop got a 3D printer!
I wanted to build three dimensional models that were three colors and which had crazy overhangs, so bolting the individual models together was a good solution.
I modified the TurtleArt procedure so it did not repeat. I created three versions of the image by running the procedure multiple times until I had three images I liked. I converted the images from .png files to .svg files. The .svg files were imported into Tinkercad, sized, and exported as .stl files for 3D printing.
The center part of the star is the largest, with the two other stars smaller in sizes. The center and middle stars are 2mm tall, while the outer star, silver in these ornaments, is 1.5mm tall. The hole in the center is shy of 3mm and is hand finished with a 3mm drill bit. The models are attached to one another with a 9mm long 3mm M3 bolt.


Assembling the models introduces additional randomness since the rays all align differently. Additionally, the resolution of my Thing-O-Matic leaves some gaps in some rays, which adds to the randomness of each ray. The gaps leave convenient places for me to string monofilament to hang the ornaments.
I am remixing the design so the order of the colors changes, too.
A design like this could easily be cut from acrylic using a laser cutter, cut from vinyl to make layered stickers, or milled in other materials.
Moving a project from bits to atoms is a beautiful way to explore and realize new dimensions in a design.
Comments